How to Electronically Sign a Word Document Online
Option 1 - CocoSign’s free eSign tool
Avail yourself of CocoSign’s e-signature tool to create, and insert signatures directly onto your Word documents for free!
Drag and drop one or more Word files in the upload area above or click on the upload button to select the file from your device, or from your Google Drive, Box, Dropbox, and OneDrive.
Note: CocoSign also allows you to eSign PDF, PNG, JPG, and XLS.
- Drag and drop the Signature or Initials field from the right toolbar to where you want to sign. Tap the field to append your signature or initial by typing, drawing or uploading a signature image.
- Add Date/Time, Email, Job Title, Company, or Text to fill additional information, if needed.
- Click Complete and click on Download to download the file in PDF format.
- Hit Email to share a non-editable copy to others.
Option 2 - CocoSign’s Microsoft add-in
You can reach CocoSign’s esignature tool from your Word document without leaving the Word platform. To make that happen, you need to have a CocoSign account and install CocoSign add-on.
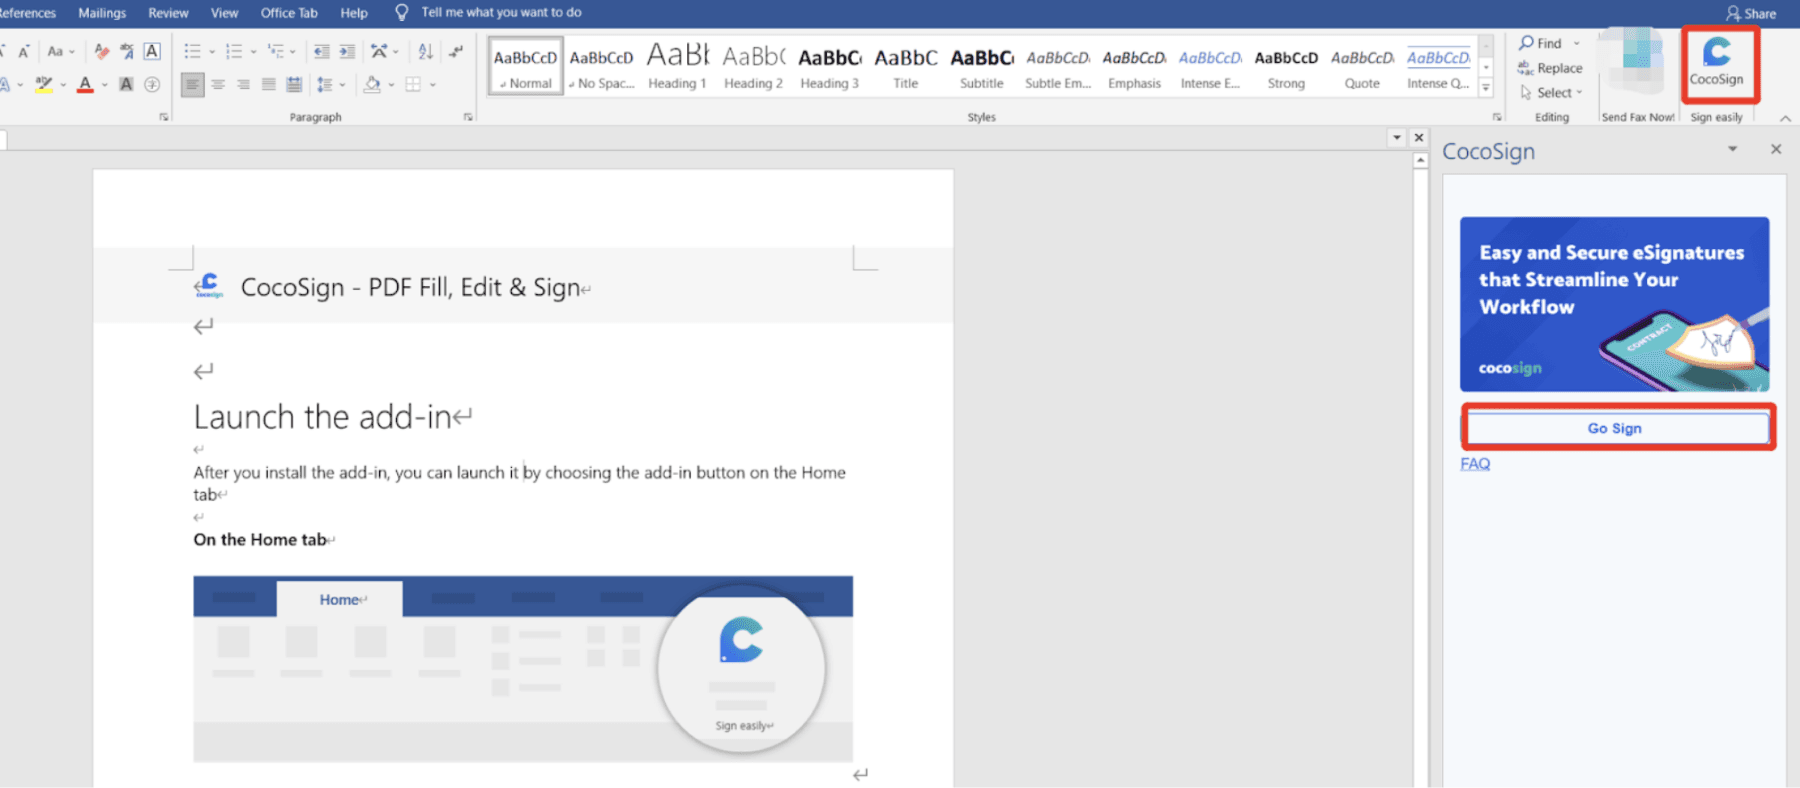
After composing the content, click the CocoSign add-on in your Word document.
![click the CocoSign add-on]()
- You will be redirected to CocoSign’s dashboard with the Word document attached.
- Check the I’m the only signer option and then sign the Word document online yourself.
There’s More to CocoSign Than E-Signing
CocoSign promises to revolutionize your signature workflow for smoother and more secure signing experiences. It opens up doors for a wide array of benefits and possibilities, including:
Easy And Convenient
- No lengthy processes involved. Upload the file that needs to be signed, choose your signature, click Complete and YOU’RE ALL SET.
- Not confined to your office. Stay on track even when on the road, through your phone or a laptop.
- No extra requirements for your signers. Signing parties aren’t required to have a CocoSign’s account to sign a document. They don’t need to print it out, scan and email back with any changes.
- No need for any prior knowledge. CocoSign provides clear-cut onboarding guidelines for all new signers, step by step walking them through the whole signing process.
Quick And Efficient
- Bulk Send - Send one or several documents simultaneously to as many as 100 recipients.
- On-time tracking - You will receive notifications when any of your recipients signs the document.
- In-person Signing - Enable your signers to sign face-to-face from your mobile phone, tablet, or PC.
- Custom Branding - Add your company logo to the signing invite, customize its color and include the name of your brand to its url. By doing so, you’re almost replacing all CocoSign’s marks with your brand’s presence.
- Templates - Create templates for frequently used documents to save yourself the headache of drafting similar documents repeatedly.
- Audit trail and history - The audit trail details and authenticates the email addresses of you and your signers, as well as document ID, and IP addresses, guaranteeing all signing activities are traceable and court-admissible.
Secure And Reliable
CocoSign employs SSL encryption (Secure Socket Layer), the foremost encryption protocol adopted by banks and governments to protect top secret data. AES 256-bit encryption technology also makes your sensitive information resilient to any cyber attacks.
How to Electronically Sign a Word Document on Windows
Besides resorting to an e-signature tool, you can also make use of Microsoft Word to electronically sign a document from your Windows. Three options are available:
- Insert a handwritten signature
- Create a reusable electronic signature template
- Sign in a signature line
Create and insert a handwritten signature
- Sign your name on a white piece of paper with a pen.
- Scan the signature using your phone’s camera or a traditional scanner.
- Upload it to your computer and save it as a JPG or PNG file.
Open the Word document to be signed. On the Home tab, under Insert, click Picture to insert the signature file.
![click Picture to insert the signature file]()
- Fine-tune the size of the picture to the desired dimensions or crop any unwanted parts of the picture.
Include typewritten texts with your reusable signature
You’re allowed to include additional information (e.g. job title) under the signature image. However, it could involve some effort if you do this repeatedly. Luckily, the Quick Parts feature comes in useful, which enables you to store the contents you use frequently so that you can insert them anywhere at any time.
- Under the signature image, type the date, company name, job title, address or other details as needed.
- Use your cursor to highlight the image and the added contents together.
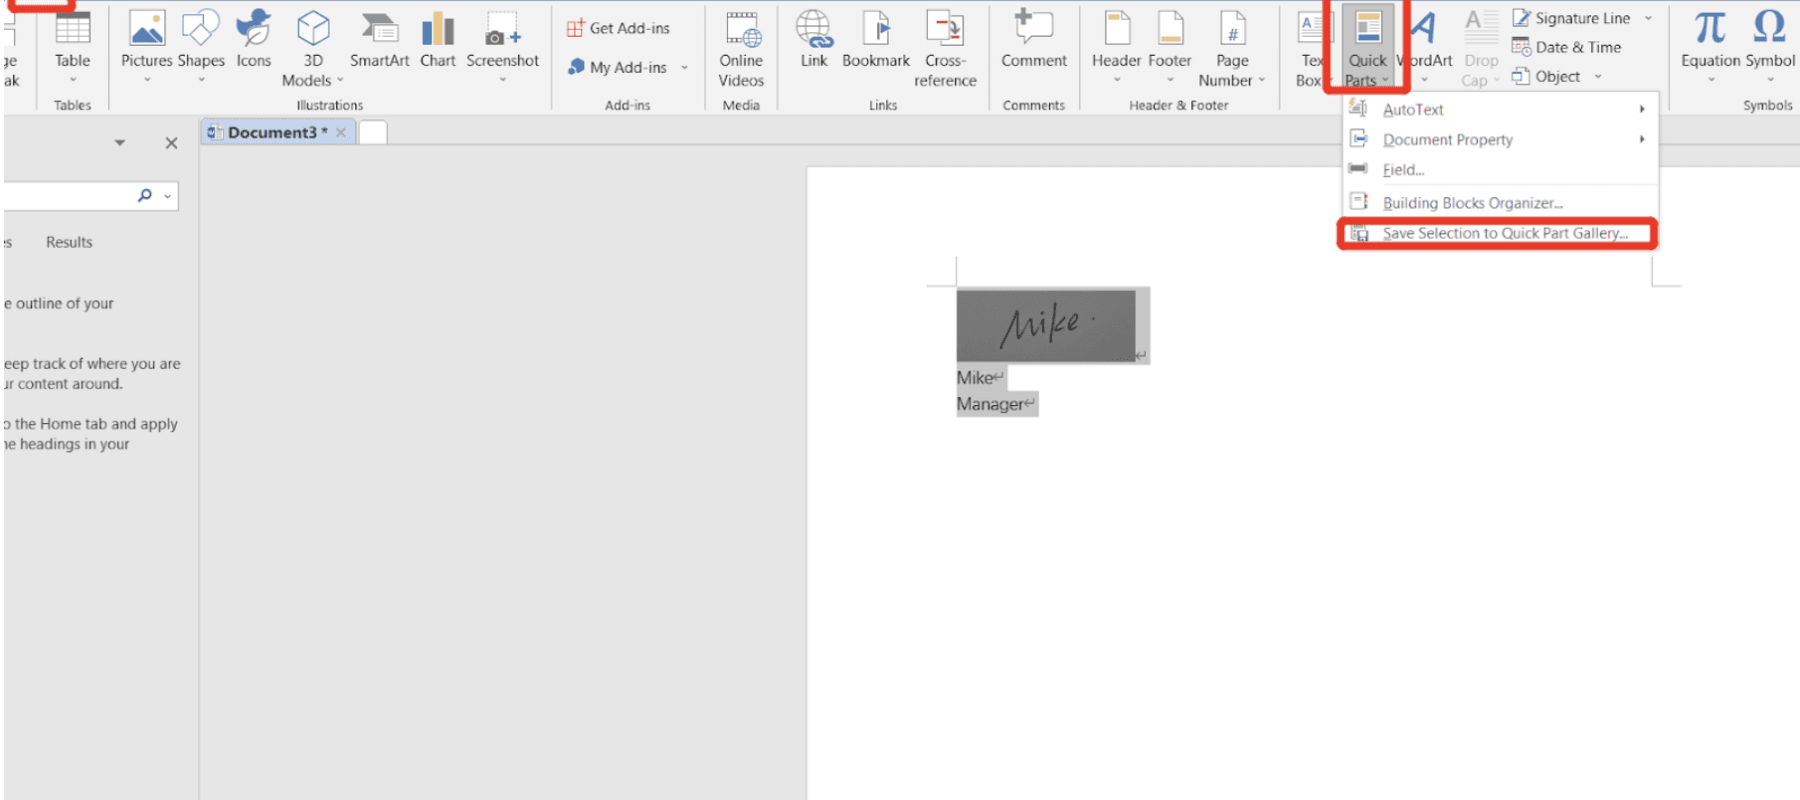
Navigate to the Insert ribbon, click Quick Parts, and then choose Save Selection to Quick Part Gallery to display a pop-up window named Create New Building Block.
![Navigate to the Insert ribbon]()
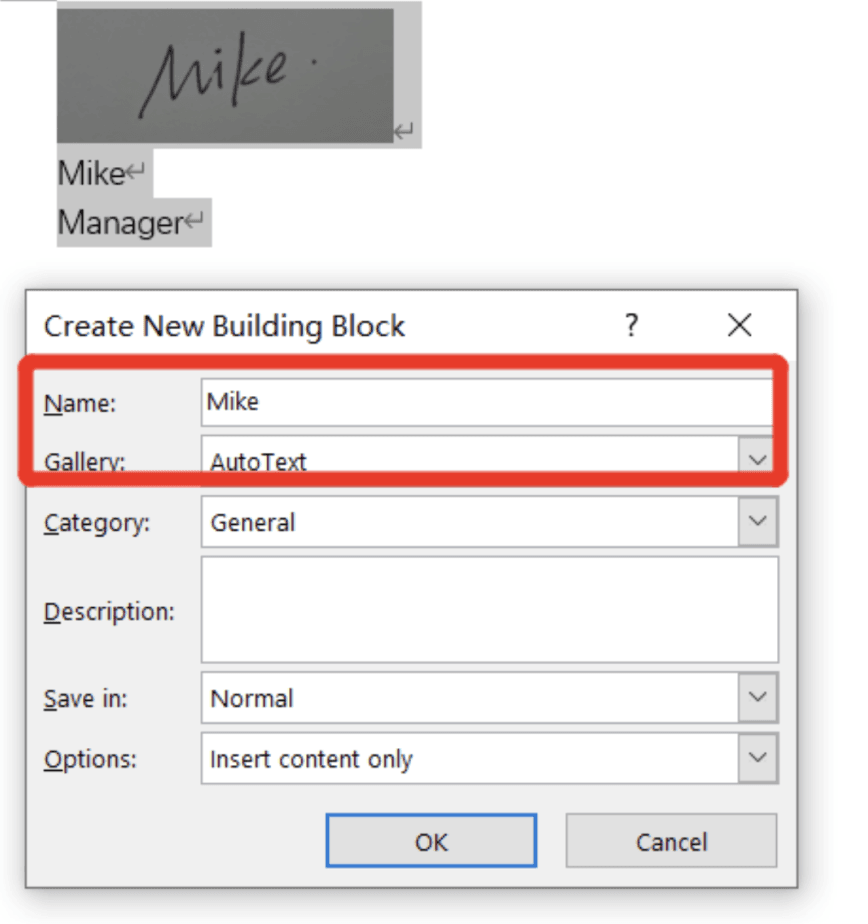
Rename the signature block, choose Auto Text in the Gallery box, and then click OK.
![Rename the signature block]()
- Now, the signature block is stored successfully. Whenever you need to reuse it, go to Auto Text, select this signature block, and it’ll be inserted into the document quickly.
Insert a signature line
A signature line is like a signature placeholder. By inserting the signature line, you can specify the information of yourself or other intended signers in advance. The signature line inserted in the Word document can be seen and signed by the intended signer.
How to insert a signature line
- In the Word document, click where you want the signature line to appear.
- Click Insert > Text > Signature Line > Microsoft Office Signature Line.
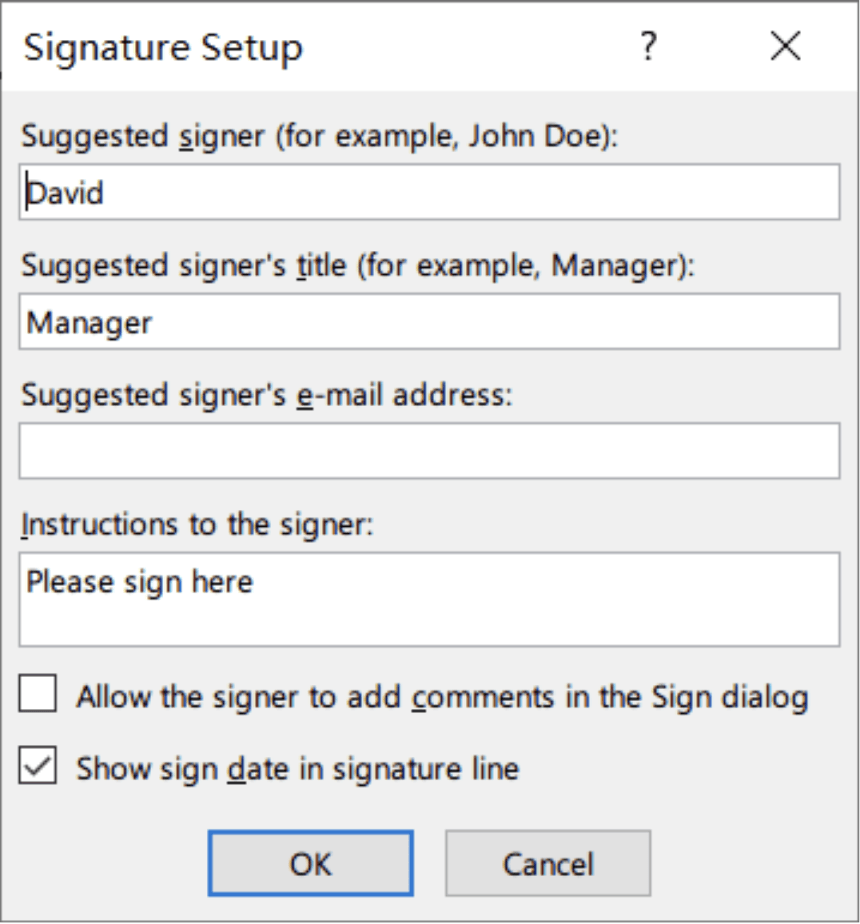
- The Signature Setup window will pop up. Input signer’s name, title into the corresponding boxes. It’s optional to add the email address.
In the instructions field, leave a note for the signer, if needed, such as "Please sign here" or "Please confirm the contents before signing."
![instructions field]()
- Click OK and the signature line will be displayed in the document.
How to sign the signature line
- Before getting started, make sure you have a digital ID, which can be obtained from a Microsoft Partner. Otherwise, you won’t be allowed to sign in a Word.
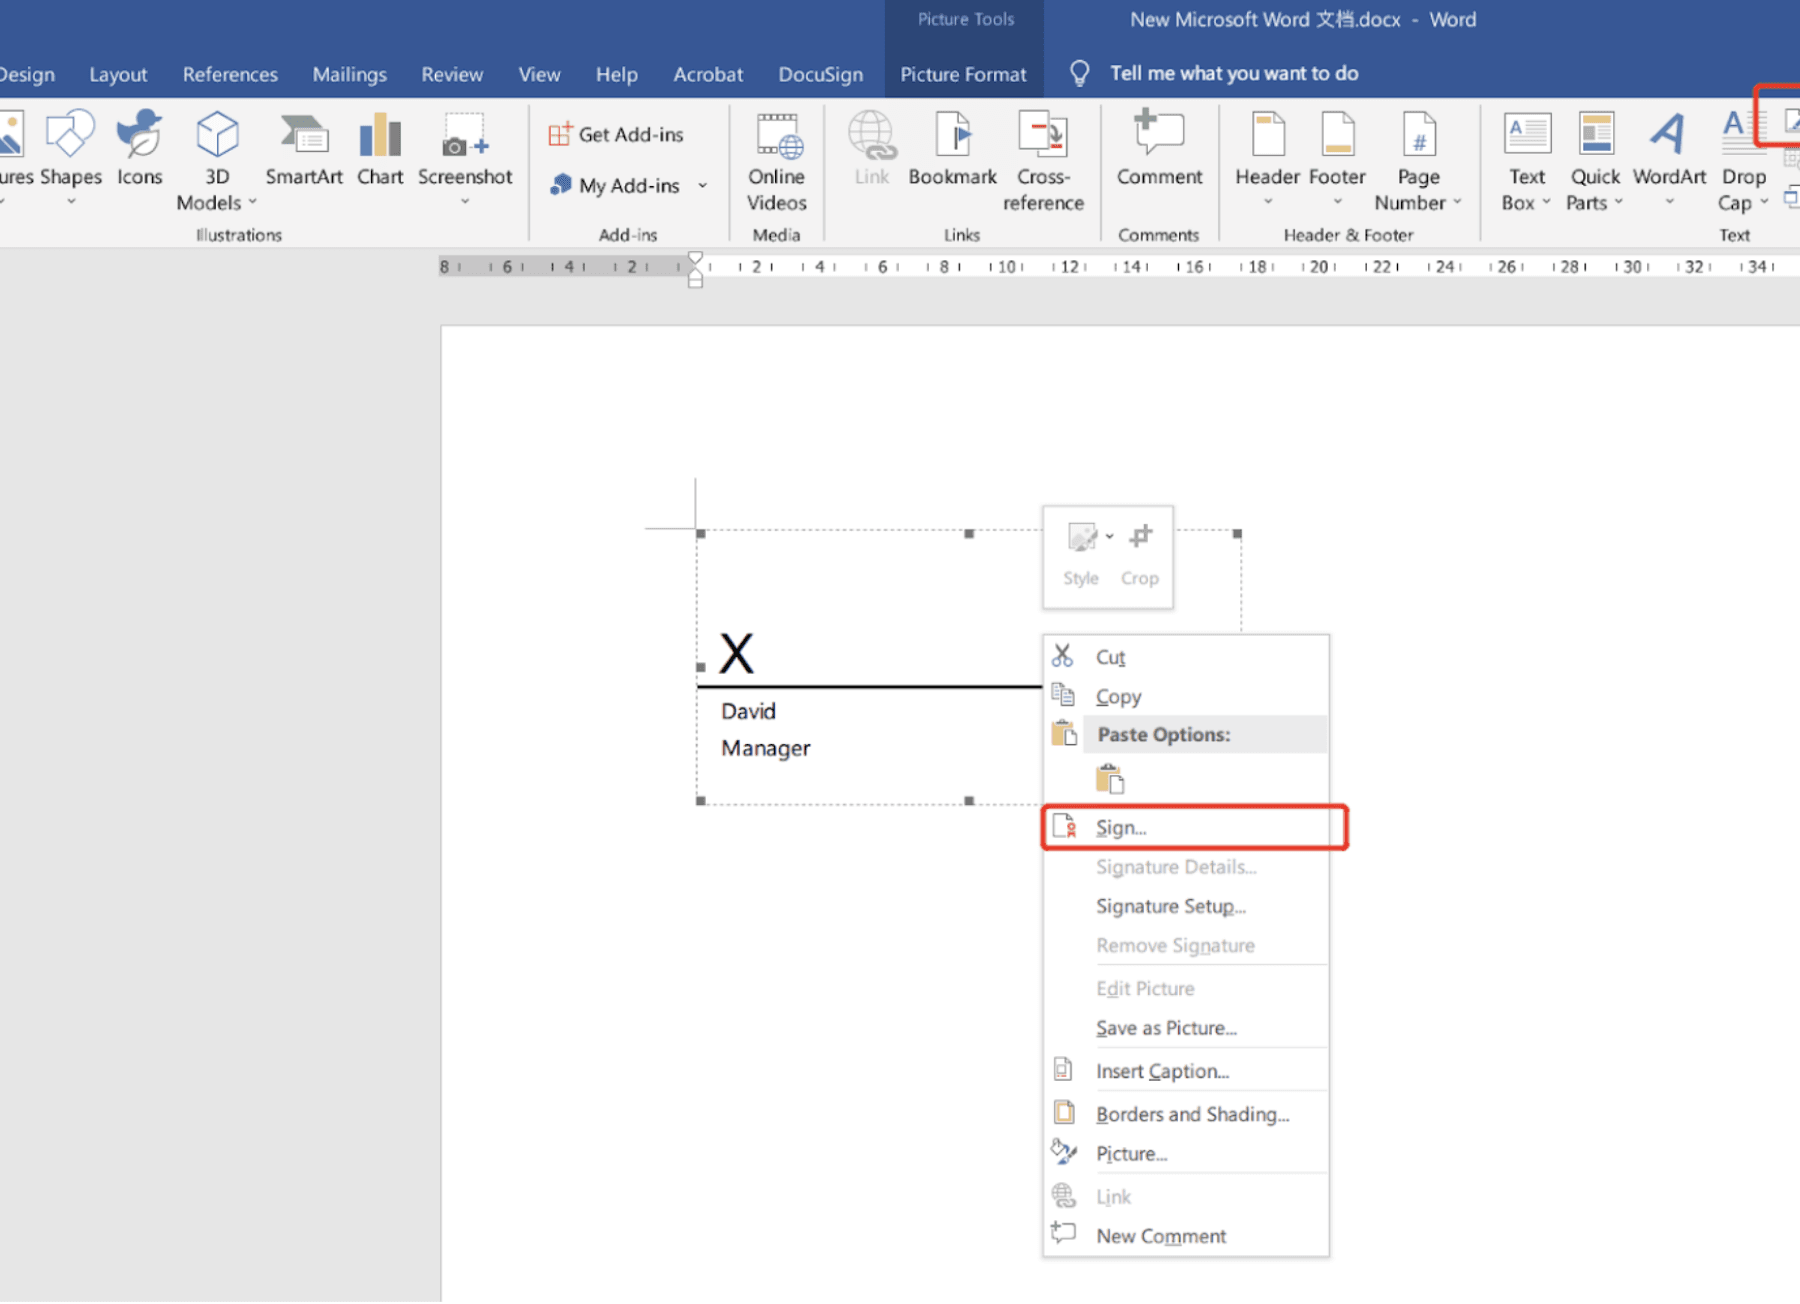
Right-click the signature line to choose Sign from the menu.
![choose Sign from the menu]()
Sign your Word document with any of the three methods below.
- Type the name in the box beside the letter X.
- Click Select Image to insert an image of your physical signature.
- Use the inking feature to add a handwritten signature (only Tablet PC users are allowed).
- Verify your digital certificate. Click the button Change if it’s incorrect.
How to Electronically Sign a Word Document on macOS
Mac users can add a signature in a word doc in under a minute.
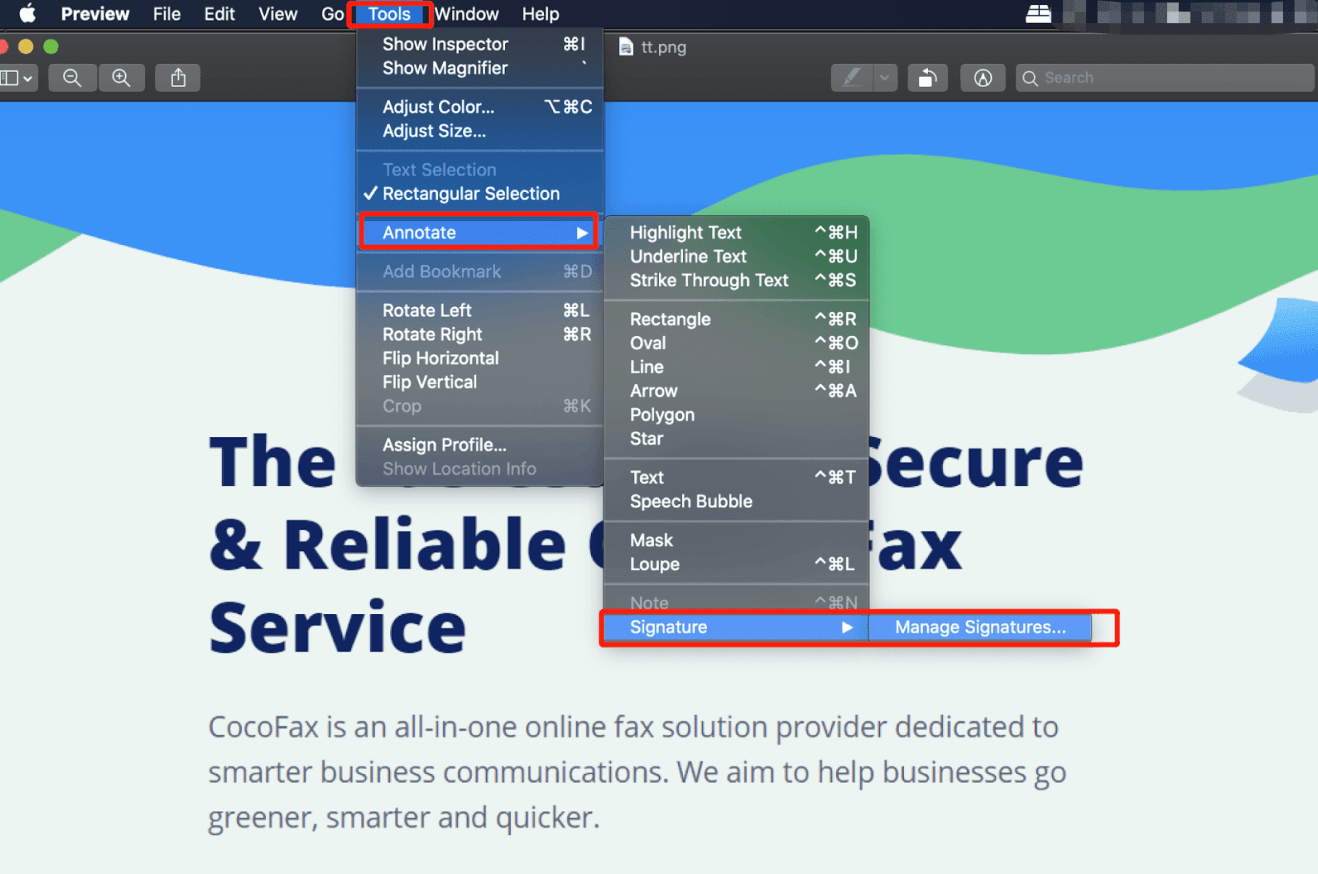
To do so, you need to first use Preview to create a signature.
- Open the Preview application
Navigate to Tools > Annotate > Signature > Manage signatures
![Manage signatures]()
You can create a signature in two ways: by camera and trackpad.
- Camera: Sign on a white sheet of paper. Hold the paper to be recognized by the camera and Preview will generate an electronic format of your signature.
- Trackpad: Use your finger or a stylus to draw on the trackpad. When this is finished, hit any key on the keyboard to finish. Click the Done button to create the signature.
After creating the signature, go to File > Save and save it to your desktop as a PNG. Now you can bring the signature image to your Word document at any time.
Open the Word document to be signed, drag the drop the signature image from your desktop to where you want the signature to be in the file. Resize it by grabbing its corner. Or, you can go to Insert > Pictures to insert your signature image.
How to Sign a Word Document on iPhone/Android
Thanks to the Microsoft Word app, signing a Word document on a smartphone is also made possible, be it iPhone or Android. Whenever you receive an email with an attached Word document for signing, signing tools you need are now on-hand.
Sign a Word Document on iPhone
- Go to the email, tap the Word file to download it and then open it again.
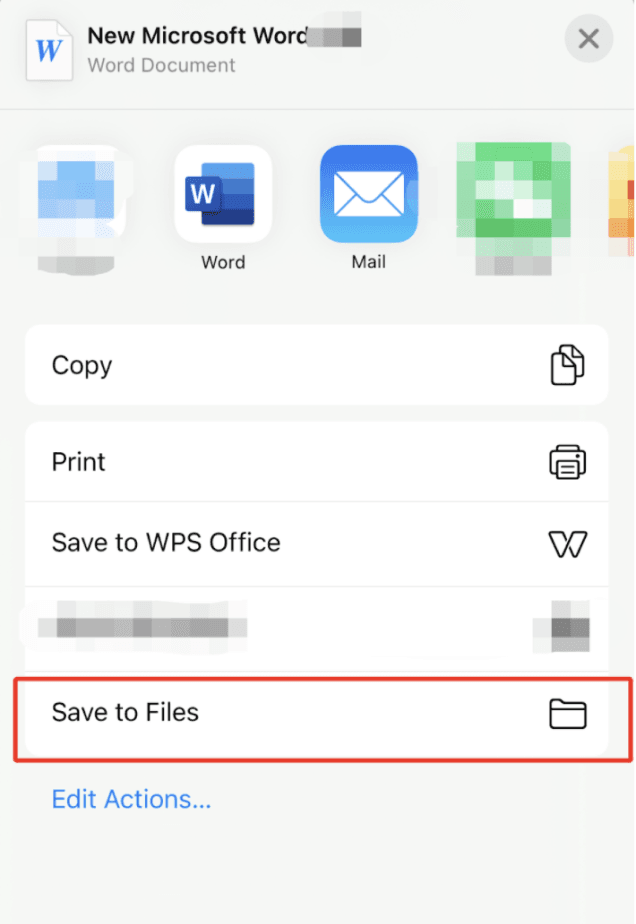
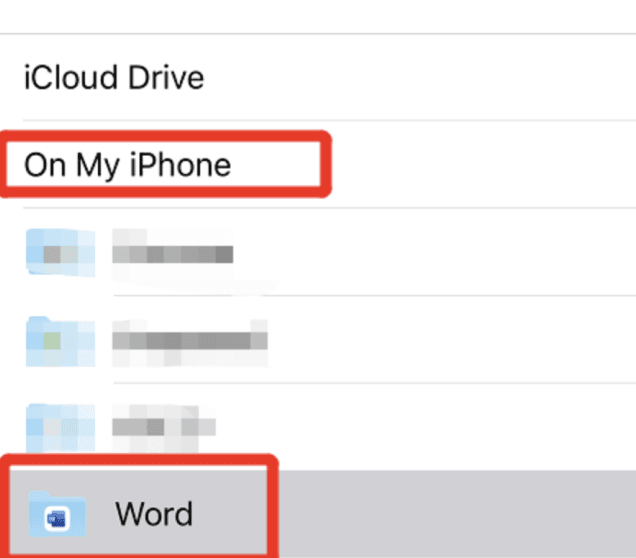
Click the Share icon and select Save to Files > On My iPhone > Word.
![Save to Files]()
![On My iPhone]()
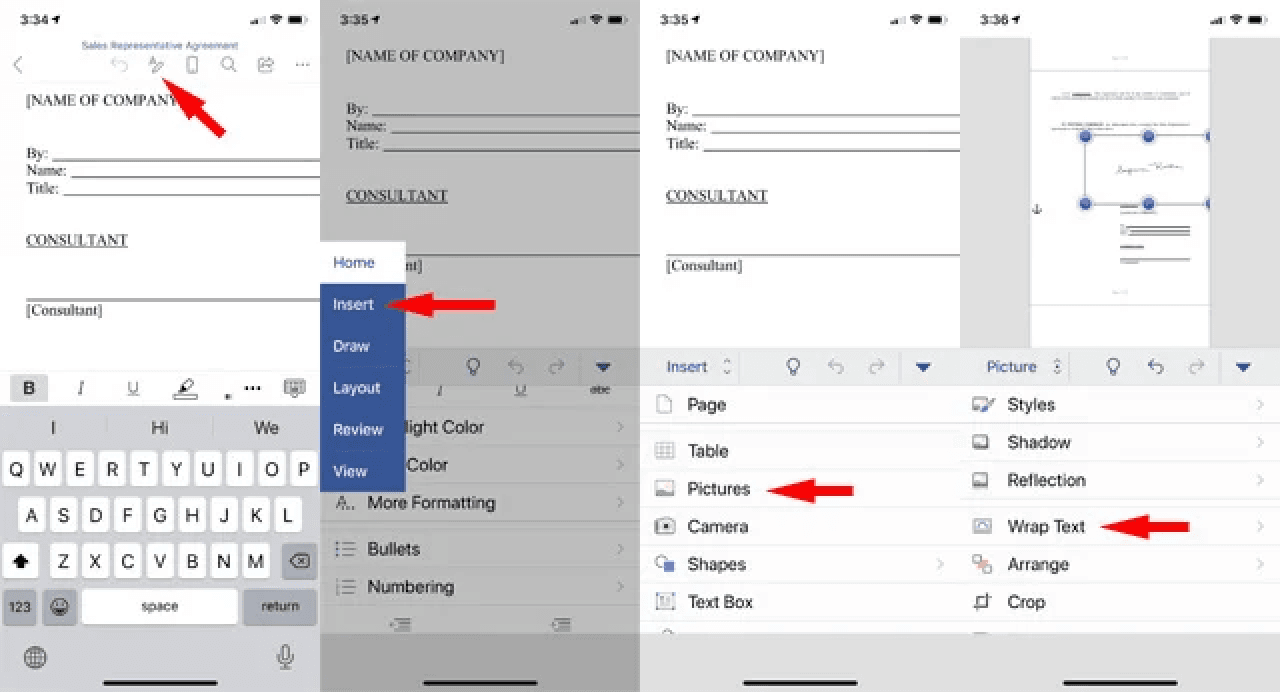
Open the Word app and locate the document. Open it to edit and sign.
- As mentioned in the last section, Microsoft Word has the signature line feature for inserting a signature. So if the document comes with a signature line for you to sign, tap it to type your name or add a handwritten signature with a stylus or your finger.
- While if the file doesn’t include a signature line, just tap where you would like the signature to appear, select Insert and then Picture. Choose an image of your signature and insert it to the document. Be calm even if it messes up the original format. Just go ahead to Wrap Text and then Behind Text. Drag your signature into the desired position and resize it to your liking.
![drawing with your finger]()
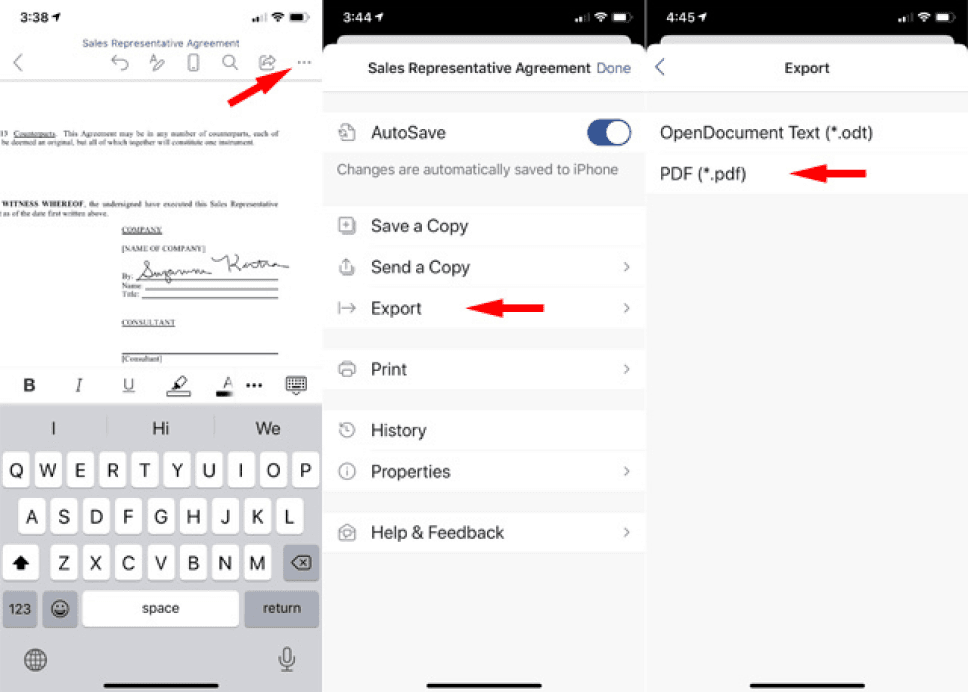
Once satisfied with the signature, save your document directly or export it as a PDF file. Signatures in PDF files are harder to be stolen by others.
![save your document directly]()
Sign a Word Document on Android
- Tap the Word document attached in the email to download it. Only then tap it again to open it with the Word app.
The file will be transferred to the app automatically. Now you can start signing.
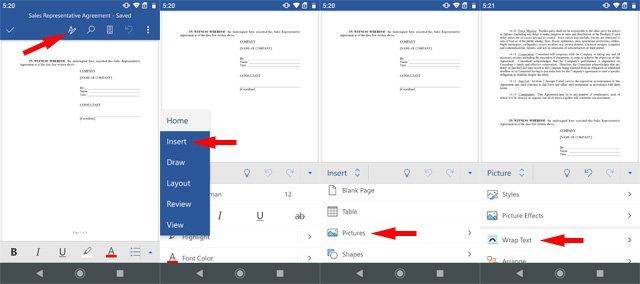
- Again, if you’re requested to sign in a signature line, click it to type your name or sign with your finger or stylus.
- Otherwise, add a signature image to the document. Next, before adjusting its size and position, select Wrap Text and then Behind Text.
![drawing with your finger]()
- Save the document. It’s highly recommended to export it to a PDF file instead, because it has more security measures to prevent your signature from being stolen.
FAQs
1. Is it safe to sign a Word online?
That depends.
The limitations of using Word for electronic signatures come into play when you simply sign by uploading signature images. There is no automatic way to learn how the recipients interacted with the Word and if they made any changes to it. This can put into question the legitimacy of signing Word with the electronic signature.
Other than that, signing Word will offer no harm if it is done through a secure platform such as CocoSign. A 256-bit SSL-encryption makes all files along with their embedded signatures very secure. Also, with its audit trail and history feature, you can identify what time or date the documents are signed. This contributes to their authenticity.
2. Are electronic signatures legal?
Yes. Multiple regulations including eIDAS, ESIGN Act, and UETA have provided legal recognition to electronic signatures, universally accepted in America, Canada, Australia and more.
3. What types of documents can the electronic signatures be used for?
Documents in all sectors can be signed electronically, including agency agreements, business sales contracts, employment contracts, lease agreements, and income statements.
4. How to electronically sign a PDF?
Besides Word, CocoSign also enables you to sign PDFs as well. Just upload your PDF you intend to sign and add your electronic signature directly. Really a piece of cake.
Additionally, if you’re using Mac, open your PDF with the Preview app, locate the markup toolbar, and choose a preferred tool to sign electronically.
To sign from a mobile phone, Apple users, open the file from your Mail app, which has several markup tools to append your signature.
